
Laboratory Investigations in Microbiology
|
Laboratory Investigations in Microbiology |
|
In order to view bacteria under a microscope, bacterial cells must first be killed and affixed to the slide, then stained with dye to make them visible. Lastly, observing bacteria with the microscope requires the use of oil immersion lenses. These techniques will be described and practiced today.
Transferring bacteria. The bacteria to be viewed can come from a variety of sources, as long as they are abundant enough. In the lab, the most common slide preparations are made from broth cultures or from agar cultures (isolated colonies or agar slant cultures). When using broth cultures, a loop of broth is aseptically transferred to the slide, spread out over a small area, and allowed to dry. When using solid cultures, a small portion of a bacterial colony is mixed into a drop of water placed onto the slide beforehand, then allowed to dry. The most common problem at this step is that too few cells (e.g. from a broth) or too many cells (from a colony) are placed on the slide. The drop of liquid should be slightly cloudy.
Heat-fixing the bacteria. Once dry, the slide with the bacteria is passed through the flame of a Bunsen burner BRIEFLY to kill the cells and to fix them to the slide. If done properly, the cells remain attached to the slide without being washed off during the staining process. After heat-fixing, the slide can be placed on the lab bench to cool off. The most common error source here is heat-fixing for too long (resulting in misshapen cells) or for too short of a period (resulting in cells that detach and float around in the field of view).
Staining the bacteria. Simple stains are basic dyes that directly stain the cells. All cells are stained alike. The stain, such as crystal violet, methylene blue, or safranin, is positively charged and thus adheres to the negatively charged cell wall of bacteria. In most instances it is enough to immerse the slide in the dye solution for 1 - 2 minutes, then wash off the dye with water. The dye will not adhere to the slide, although a few dye crystals may still be seen under high magnification (and may be confused by the inexperienced microscopist as bacterial cells). After staining and rinsing, the slides are allowed to air-dry (or may be blotted dry carefully). The most common problem encountered at this stage is wiping off cells when intending to dry the slide.
Negative Staining. When using a negatively charged dye such as nigrosin, the result is quite different. The cells will remain unstained (clear) because they repel the dye, and the background will be stained dark. This type of stain is called a negative or background stain. It is useful to determine cell shape and arrangement, and is often used to detect capsules surrounding a cell.
Viewing bacteria under oil immersion. Since most bacterial cells (except the cyanobacteria we saw last time) are very small (~ 1 - 10 µm), viewing them successfully requires use of a technique called oil-immersion microscopy. Immersion oil has a refractive index similar to that of glass, meaning that a beam of light will not refact (bend) as much when it passes from the glass slide to the oil and back to the glass of the lens. This increases the amount of light and the resolution of the image.
Once the slide is dry, the stained area of the slide is located with the low-power objective lens as described previously. Keep in mind that you will rarely be able to see actual cells at this stage! Once in focus and centered, a drop of immersion oil is placed directly on the slide where the cone of light illuminates it, and the red-trimmed lens (100x, oil-immersion) is rotated into place. (To avoid getting oil on the 40X lens, rotate the yellow-banded lens away from the slide). The drop of oil should now fill the gap between the slide and the tip of the oil-immersion lens. (If this is not the case, recheck your focus on low power to make sure you are viewing the stained area on the slide). A common problem that occurs here is that the oil immersion lens hits the slide before it is completely in place. This occurs when you accidentally focus on the BOTTOM of your slide where stain that was washed off the top sometimes dries on. In this case, return to low power, lower the stage slightly and try to re-focus on the top of the slide! Once in view under oil immersion, the image will appear dimmer and slightly out of focus. You will need to increase light (dimmer switch, iris diaphragm), raise the condenser lens as high as it will go, and adjust the fine focus knob.
Viewing bacterial morphology (Atlas Chapter 4). Using the oil immersion lens, you will be able to observe both the shape and the arrangement of various types of bacteria.
Bacteria have four common shapes: coccus (round), bacillus (rod-shaped), vibrio (curved/comma-shaped), and spirillum (spiral). Some of the common arrangements of bacterial cells that you may notice are chains (strepto-), clusters (staphylo-), pairs (diplo-) and single cells. Keep in mind that these arrangements are not always seen, especially in bacteria from agar colonies. The best views of cell arrangements are obtained from young broth cultures where bacteria grow unrestricted. Examples of cells you will view include:
Escherichia coli: single rod-shaped cells, approx. 1 µm thick and 3 µm long. In a dense smear preparation, they may appear clumped. (Rod shape: Atlas Fig. 4.9 and 4.10)
Staphylococcus aureus: clustered coccus-shaped cells, each approx. 1 µm in diameter. Even when spread thinly, many cells are clumped/attached in random patterns. Single cells also commonly seen. (Atlas Fig. 4.24)
Vibrio parahaemolyticus: Rod-shaped to comma-shaped, approx. 2 - 3 µm long. Mostly single. (compare to Atlas Fig. 4.16)
Rhodospirillum rubrum: Spiral-shaped cells, ~ 1 µm thick but ranging in length from a few micrometers (partial spiral, or curved) to 20 µm or more (complete spiral). (Atlas Fig. 4.12 and 4.13)
Corynebacterium pseudodiphtheriticum:
Rod-shaped cells, often with slightly thickened ends (diphtheroid). Arrangements
are often "palisade", where 4 or more cells lie parallel to each
other.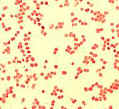 (Atlas Fig.
4.27 and 4.28)
(Atlas Fig.
4.27 and 4.28)
Neisseria sicca: Paired cocci measuring ~ 1 µm in diameter. (Atlas Fig. 4.20)
 Bacillus subtilis: Long chains of
rod-shaped cells, each measuring ~ 2 µm thick and 5 µm long. Filaments
(chains) of these cells can measure hundreds of micrometers long. Often,
endospores are visible in stained preparations as round unstained areas in the
middle of each cell. (Atlas
Fig. 4.26)
Bacillus subtilis: Long chains of
rod-shaped cells, each measuring ~ 2 µm thick and 5 µm long. Filaments
(chains) of these cells can measure hundreds of micrometers long. Often,
endospores are visible in stained preparations as round unstained areas in the
middle of each cell. (Atlas
Fig. 4.26)
Streptococcus pyogenes: Round cells of ~ 1 µm in diameter, often forming long chains of cells. (compare to Atlas Fig. 4.21)
Micrococcus luteus: Round cells, usually clustered together in groups of four called tetrads.
Streptomyces antibioticus: Long, thin cells, typically 5 - 10 um in length. These occur in long, branching filaments.
© 2003 - 2018 José de Ondarza, Ph.D.