Microbiology Laboratory Software
 ScopePhoto
software for use with digital microscope cameras
ScopePhoto
software for use with digital microscope cameras
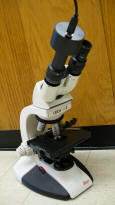
Each lab station will have use of a DM300 digital microscope
camera, allowing you to capture still images of what you are looking at. The
camera works in association with the ScopePhoto software on your lab station
computers.
- Connect the camera to the computer via the USB cable provided
- A dialog box will open up the first time the camera is connected to the
computer each day
- Follow instructions in the dialog boxes to install the drivers for the
camera by clicking NEXT, OK, or CONTINUE and FINISH.
- If after starting the software it cannot find the camera, unplug and
reconnect the camera's USB cable and repeat steps a - b
- Start your ScopePhoto software
- Click on the SD button (Select Device) and select the DM300 camera
- Click on the TC button. A live image should now appear in a new window on
your screen. The live window will also include a button for taking a picture
(CAPTURE)
- If you start the camera's live view by clicking on the DC300 link, this
button option will not be shown
- Adjust your view with the microscope controls.
- You will need to adjust the light level. The camera is more light
sensitive than you; if the live view is all white, turn down the light
(dimmer switch)!
- Using your stage controls and fine focus, find the best view
- Once you are satisfied with the image you see, click the CAPTURE button.
An unnamed image will pop up in a new window
- Save the image using the SAVE AS command
- I recommend that you save the
image to your pen drive. If not available, you can also save it to the
computer's Thaw Space (T drive) or save it to the desktop and then email it
to yourself.
- I recommend saving it as a jpg file. The default option (bmp) created
very large files
- You can open a saved picture using the software's OPEN command
- Merging two image files (for the purpose of measuring cell size, e.g.)
- Open the image files you wish to merge. This will usually be one image
entitled "micrometer" and one image of the cells you wish to measure
- Micrometer scale images can be downloaded from Moodle. There is one for
each lens, i.e. micrometer_4x, _10x, _40x and _100x. Save them to your thaw
space, then open them with ScopePhoto
- On the Process drop-down menu, select the Image Fusion
command
- In the menu box that opens, click on the two image files that you wish
to merge. Click the ADD button, then click FUSE
- The merged image file will open in a new window. You may save this image
and/or perform your measurements immediately
- NOTE: You must use the micrometer scale for the same lens (4x, 10x, 40x
or 100x) with which you took the picture of your cells
Microsoft Excel for creating graphs (Chapters 10 & 12)
I
© 2003 - 2022 José de Ondarza, Ph.D.
